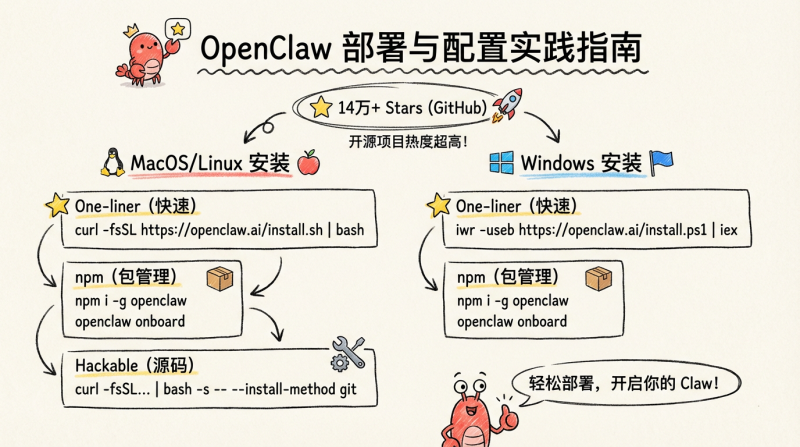

短短一个月内,一个名为 OpenClaw(曾用名 Clawdbot、Moltbot)的开源项目,在 GitHub 上狂揽超过 14 万颗 Star,其热度甚至盖过了多家大模型公司的新品发布。
基础部署教程

安装语法
##Macos/Linux
One-liner:curl -fsSL https://openclaw.ai/install.sh | bash
npm:
# Install OpenClaw
npm i -g openclaw
# Meet your lobster
openclaw onboard
Hackable
# For those who read source code for fun
curl -fsSL https://openclaw.ai/install.sh | bash -s -- --install-method git
##Windows
One-liner:iwr -useb https://openclaw.ai/install.ps1 | iex
npm:
# Install OpenClaw
npm i -g openclaw
# Meet your lobster
openclaw onboard
Hackable
# For those who read source code for fun
curl -fsSL https://openclaw.ai/install.sh | bash -s -- --install-method git
详细安装命令请看官方:https://openclaw.ai/
MAC部署
可视化

安装完是图片这样子

但是你要配置模型接口,一般是自定义的接口,打开终端输入openclaw config 配置model和接入第三方聊天工具:QQ,Telegram


配置模型只要第二个:Model

自定义接口选择Custom Provider
API Base URL是自定义链接

API key

选择第一个回车,然后填入对应的密钥或者key

Endpoint compatibility 我的接口是选择第二个Anthropic-compatible

然后输入模型名称:gpt-5.4 claude-opus-4.6

然后继续下一步就能完成了
接入QQ
https://q.qq.com/qqbot/openclaw/index.html


按照openclaw原生接入流程就能接上QQ了
接入telegram

选中Channels回车

继续回车

看到telegram


然后创建机器人把这个token:8620204583:AAHtVQCUsQL9vyACF7MubRe3ASoe7rbkn0M 填入到里面

确认无误点击完成

进入配对模式 系统会询问安全策略,选择 yes,默认使用配对模式

选择 配对(Pairing)。

继续

完成配对 在终端执行以下命令,将 openclaw 与你的 Bot 绑定:openclaw pairing approve telegram 你的配对码看到成功提示即表示配对完成。

© 版权声明
文章版权归作者所有,未经允许请勿转载。
THE END


暂无评论内容